
PlankBuddy
Plan vinyl plank and laminate flooring, plank by plank
Get a layout plan with rows, cuts, offcuts to reuse and boxes to buy – before you cut a single plank.
Free, no account needed!
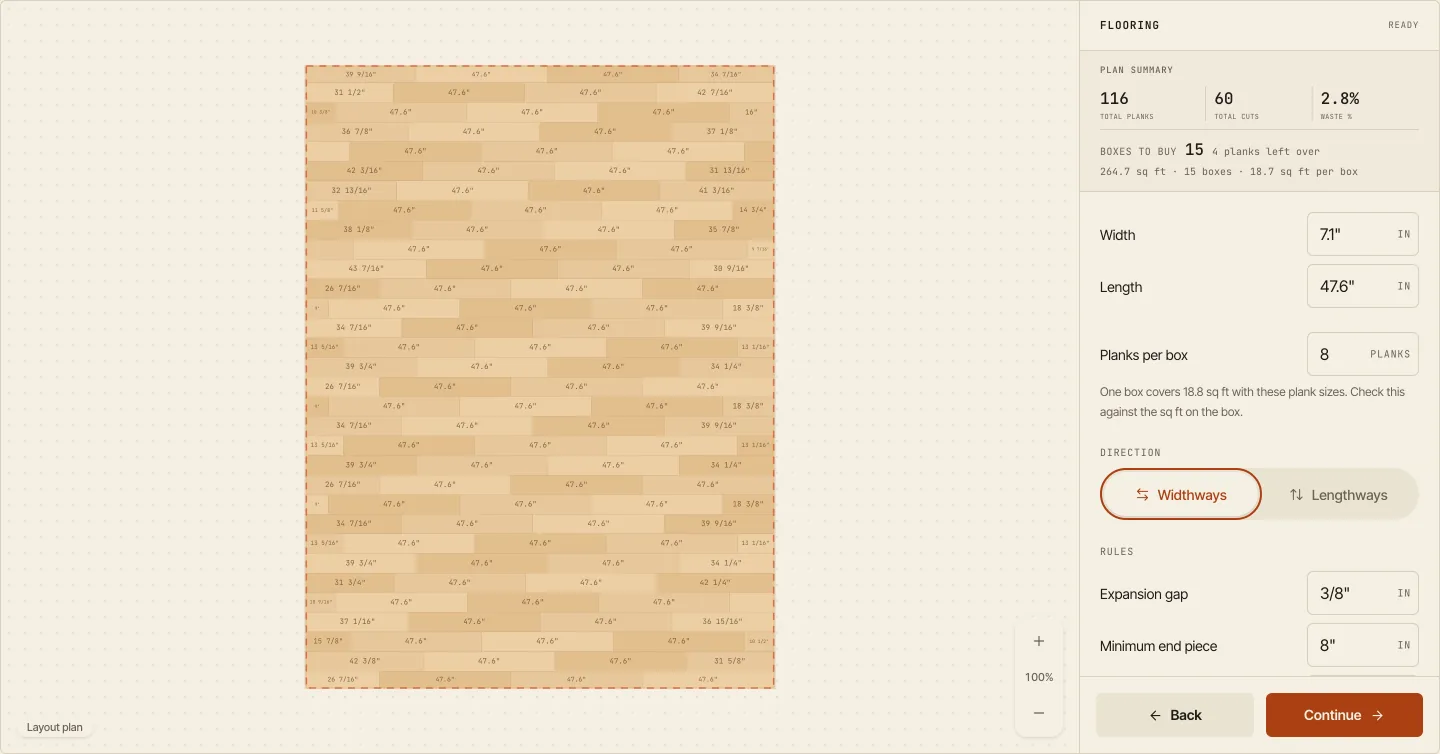
- Plank length in every row: each plank in inches
- Width of the last row
- Planks, cuts and waste
- Boxes to buy
Plank lengths for every row
See where full and cut planks go before you make the first cut, in feet and inches.
Cut list
Take a clear, row-by-row list of cuts to the job, rounded to 1/16".
Offcuts in the plan
See which offcuts are planned for later rows and which ones the plan does not use.
How it works
Three steps from room measurements to a plan you can work from
PlankBuddy shows more than the square footage. You get plank lengths, row widths, cuts and a plan for reusing offcuts.
- 01
Measure the room
Enter a rectangular or L-shaped room, or build a more complex shape from several rectangles. Enter the size in feet and inches and mark any areas without flooring.
- 02
Set the planks and rules
Enter the plank size and direction. Take the expansion gap, minimum end piece, stagger and minimum row width from your installation instructions.
- 03
Install the floor row by row
Use the cut list, room plan and offcut plan as your working guide.
Before the first cut
What to check before you install the first plank
PlankBuddy plans with the measurements you enter. The installation instructions for your product and the conditions on site always come first.
How many boxes of flooring do I need?
Enter the number of planks per box, as printed on the box, and PlankBuddy counts the boxes from the planks your layout plan actually uses, cuts included. Store calculators usually start from square footage and add a flat waste factor. Our count adds no extra, so buy any spare planks your flooring manufacturer recommends.
Which direction should I lay vinyl plank or laminate flooring?
Window light and the shape of the room help you decide. Running the planks along the longest wall or toward the main light source are common starting points, but the subfloor and your product's installation instructions can set other requirements. In PlankBuddy you can compare both directions and see how the rows, cuts and waste change.
How do I plan a floating floor with as little waste as possible?
Measure the room carefully and plan the row widths and starting pieces before you cut. Keep offcuts that fit later rows and still meet your rules for end pieces and stagger. PlankBuddy works out a cut list and shows which offcuts the plan reuses.
How do I avoid a very narrow last row?
Work out the width of the last row before you install the first one, and allow for the expansion gap that your baseboard or quarter round will cover. If the last row would be narrower than your installation instructions allow, cut the first row narrower so both rows end up wider. In PlankBuddy you set a minimum row width and see the first and last row widths in the plan.
How far apart should the end joints be?
Stagger the end joints in neighboring rows as your installation instructions describe. The minimum depends on the product; no single number applies to every vinyl plank, laminate or engineered hardwood floor. Enter the stagger from your instructions in PlankBuddy so the plan uses it.
Can I use the offcut to start the next row?
Yes, if it is long enough, its locking edge is intact and the required stagger is kept. If it does not fit the next row, it may fit a later one. PlankBuddy shows which row an offcut comes from and where the plan uses it again. Check the piece against the plan before you install it.
Ready to measure?