
Laying hybrid flooring: the job at a glance
- Measure the room and work out how much flooring you need.
- Leave the boxes to acclimatise in the room.
- Check that the subfloor is dry, level and clean.
- Lay a moisture barrier and underlay as the instructions say.
- Choose the laying direction and plan the first and last rows together.
- Lay the first row with an expansion gap at the wall.
- Stagger the end joints row by row.
- Cut the last row to width and lay it.
- Fit the floor round door frames, pipes and thresholds.
- Remove the spacers and fit the skirting or scotia.
These steps are for floating click floors: hybrid, laminate and engineered timber, the floors most people lay themselves. The installation instructions for your exact product always come before general advice.
1. Choose the floor and read the installation instructions
Hybrid, laminate and engineered timber can share a similar click joint but have different requirements for the subfloor, moisture, underfloor heating and the expansion gap. Read the instructions before you buy underlay and settle on measurements. They tell you how level the subfloor must be, how wide the expansion gap must be and how short an end piece can be.
2. Measure the room
Measure the length and width of the room in several places, because walls are rarely straight. Mark alcoves, columns, kitchen islands and any other areas where no boards will go. For an L-shaped or more complex room, the part measurements must together describe one continuous floor area.
How many boxes of flooring do you need?
The floor area is your starting point. A room of 4.2 × 3.5 m is 14.7 m². A box of six 1500 × 180 mm hybrid planks covers 1.62 m², so 14.7 m² needs 10 boxes, and that still covers a 10% allowance for cuts. Retailer calculators (Bunnings, for example) work out the area and boxes and leave the allowance for cuts to you. A laying plan answers a different question: how the actual boards fit and are cut in this room.
3. Let the flooring acclimatise
Bring the unopened boxes into the room where the floor will be laid and leave them flat. Many manufacturers state 48 hours at normal room temperature; check the time your instructions give. A floor laid straight from a cold garage or a hot car moves afterwards, and the joints can open or the floor can lift.
4. Prepare the subfloor
The subfloor must be dry, level, clean and firm. Remove carpet and other soft floor coverings. On a concrete slab, grind down high spots and fill dips; on particleboard (such as yellow tongue) or timber floorboards, screw down anything loose or creaking. Check flatness with a 2 m straightedge or a long, straight board. The instructions say how much unevenness is allowed, often only a few millimetres.
Moisture barrier and underlay
On a concrete slab, and over underfloor heating, most instructions ask for a moisture barrier, often 200 µm builder's film. Many ask you to overlap the sheets by about 200 mm, tape the joins and turn the film a little way up the wall. Many hybrid boards have underlay attached; if your instructions say no extra underlay, do not add one. For floors without it, the underlay goes on top of the barrier: it evens out small irregularities and reduces footstep noise. Apartments often need an acoustic underlay rating, so check your building's requirements as well.
5. Choose the laying direction
The direction changes the number of rows, the board lengths, the cuts and how the floor meets the shape of the room. Boards are most often laid towards the light from the main window, or along the longest wall. Over old floorboards, the new floor often runs across them. Compare both directions before you start cutting, and read which way to lay hybrid flooring for hallways and open-plan rooms.
6. Plan the first and last rows together
If the usable width of the room is not a whole number of boards, the first or last row has to be cut to width (ripped). Plan both rows together so you know their widths in advance and can spot a needlessly narrow last row.
Example: The room is 3500 mm wide. With a 10 mm expansion gap on both sides (an example value; use the gap for your floor) that leaves 3480 mm. With 180 mm wide boards you get 19 full rows and a last row of only 60 mm. Instead, cut the first and last rows to 120 mm each: 18 full rows and two edge rows of the same width. The example uses the board's covering width.
7. Lay the first row with an expansion gap
Start along the longest straight wall. Put spacers between the floor and the wall so the expansion gap is right. Many hybrid manuals state 8–10 mm, but your product's instructions come first. Large rooms and timber floors may need more. Check with a string line that the first row is straight, because every row after it follows it.
8. Stagger the end joints row by row
End joints in neighbouring rows must not land too close together. Start the next row with the offcut from the previous one if it is long enough. The minimum stagger and the shortest end piece are in the instructions. Figures differ by brand and product: for laminate, Quick-Step states at least 300 mm and EGGER at least 200 mm. Take the value for a hybrid floor from its own manual. Avoid a regular staircase pattern as well.
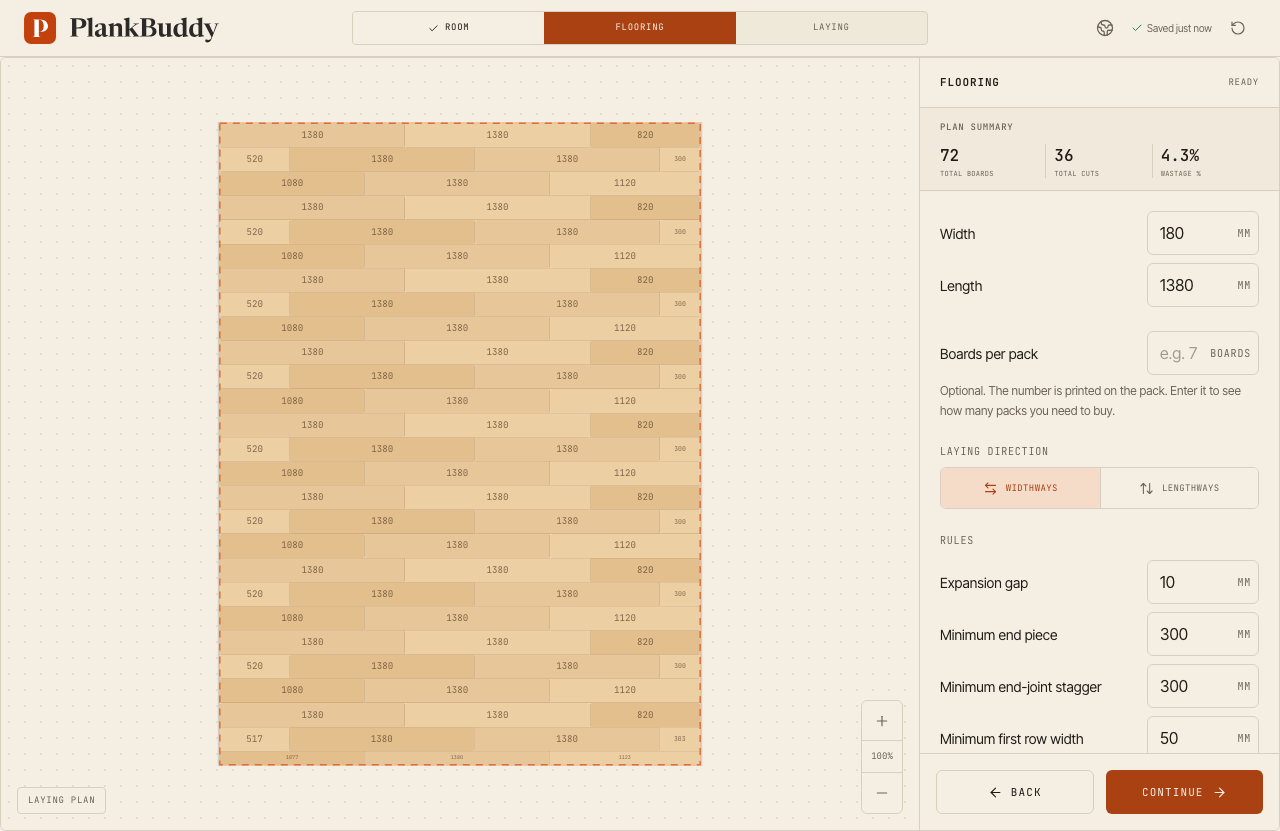
Example: A row is 4580 mm long after the expansion gaps. With full 1500 mm boards you get 3 full boards and an end piece of only 80 mm. Start the row with a 800 mm piece instead, and 2 full boards follow with an end piece of 780 mm. PlankBuddy makes this check in every row and shows where to cut.
9. Lay the last row
Measure the distance to the wall at both ends of the row, because the wall may not be straight. Take off the expansion gap, mark the line on the board and cut it to width. Use a pull bar to close up the last row where there is no room for a tapping block.
10. Door frames, pipes and thresholds
Undercut the door frame so the board and underlay slide underneath: lay a loose board on a piece of underlay as a guide and cut with a flush-cut saw or a multi-tool. For a pipe, drill a hole the pipe's diameter plus twice the expansion gap, cut out a section of the board and glue it back in behind the pipe. Doorways and large floors often need an expansion joint covered by a transition strip.
11. Fit the skirting and check the floor
Remove the spacers. Fix the skirting or scotia to the wall, not to the floor, so the floating floor can move. Fit pipe covers round the pipes and check that no joints have opened.
Tools for laying hybrid flooring
- Tape measure, try square and pencil
- Mitre saw or handsaw for cross-cuts, jigsaw for notches
- Tapping block, pull bar and rubber mallet
- Spacers for the expansion gap
- Straightedge to check flatness
- Knife and tape for the moisture barrier and underlay
- Multi-tool or flush-cut saw for door frames, drill for pipe holes
Common mistakes when laying hybrid flooring
- No acclimatisation. The floor moves afterwards and the joints open.
- Too small an expansion gap. The floor can lift when it expands.
- An uneven subfloor. The click joints are strained and can creak or break.
- Working out the last row too late. It ends up as a narrow sliver that is hard to lay.
- End pieces too short and joints too close. The floor is weaker and looks busy.
- Skirting fixed to the floor. A floating floor can no longer move.
How PlankBuddy helps
PlankBuddy works out a laying plan for straight rows in rectangular, L-shaped and more complex rooms. You see the width of the first and last rows, the length of every board and where the end joints fall. The plan also follows every offcut: it is reused in a later row if your rules allow, and only counts as waste when the plan cannot use it. You get a cutting plan, row by row, and can read how to work out flooring wastage.
Questions about laying hybrid flooring
Can I lay hybrid flooring myself with no experience?
Yes. A floating click floor in an ordinary room is one of the most common DIY jobs. What decides the result is the preparation: a dry, level subfloor, the right expansion gap and a plan for the first and last rows. Ask an installer for help if you are unsure about moisture, underfloor heating or a wet area.
Do I need a moisture barrier under hybrid flooring?
On a concrete slab most instructions ask for one, often 200 µm builder's film with overlapped, taped joins, and boards with attached underlay may still need it. On a dry timber subfloor it is rarely needed. Check what your hybrid's instructions say about the slab, the barrier and any extra underlay.
How big should the expansion gap be?
Check your product's instructions first. Many hybrid manuals state 8–10 mm at walls and fixed objects, and large rooms or timber floors may need more. Enter the gap from your instructions in PlankBuddy and it is taken off the usable floor area.
Which way should I lay hybrid flooring?
Boards are usually laid towards the light from the main window, or along the longest wall. Over old floorboards, the new floor often runs across them. Compare both directions in PlankBuddy, because the rows, cuts and waste can differ a lot.
Where do I start laying hybrid flooring?
Usually along the longest straight wall. First work out how wide the last row will be. If it would be too narrow, cut the first row to width as well, so the two edge rows are roughly the same width.
Before you start, check the laying rules that shape every row: the expansion gap, the end-joint stagger and the shortest end piece.