
Floating engineered timber: the job at a glance
- Read the installation instructions: floating or glued, underlay, gap and stagger.
- Leave the unopened boxes to acclimatise in the room.
- Check that the subfloor is dry, level and firm.
- Lay a moisture barrier and underlay as the instructions say.
- Plan the rows: direction, first and last row widths, and the stagger.
- Lay the first row with spacers for the expansion gap.
- Stagger the end joints and start rows with offcuts where the rules allow.
- Cut the last row to width, then fit the skirting or scotia.
Before you start
Remove carpet and other soft floor coverings. On a concrete slab, grind down high spots and fill dips; on particleboard (such as yellow tongue) or timber floorboards, screw down anything loose or creaking. Check flatness with a 2 m straightedge; the instructions say how much unevenness is allowed. Timber reacts to moisture more than laminate does, so check the subfloor moisture as the instructions describe, especially on a new concrete slab.
Acclimatising
Bring the unopened boxes into the room and leave them flat. Many manufacturers state 48 hours at normal room temperature; check the time your instructions give. Open the boxes only when you start laying.
Moisture barrier and underlay
On a concrete slab, and over underfloor heating, most instructions ask for a moisture barrier, often 200 µm builder's film with overlapped, taped joins. On top goes the underlay your timber manufacturer names for a floating floor; some underlays have a barrier built in. Apartments often need an acoustic underlay rating, so check your building's requirements as well.
Slabs, yellow tongue and timber floorboards
On a concrete slab, check that it is dry enough before you start, as your instructions describe, and grind down high spots. Upstairs and in older houses, the subfloor is often particleboard such as yellow tongue, or timber floorboards: screw down anything that moves, and sand or fill joints that stand proud.
In an apartment, check the strata by-laws on acoustic underlay before you buy, because the underlay may need a tested rating.
Plan the rows before you cut
Long boards make mistakes expensive: a wrong cut on a 1900 mm board wastes far more than on a short laminate board. Plan three things together before the first cut.
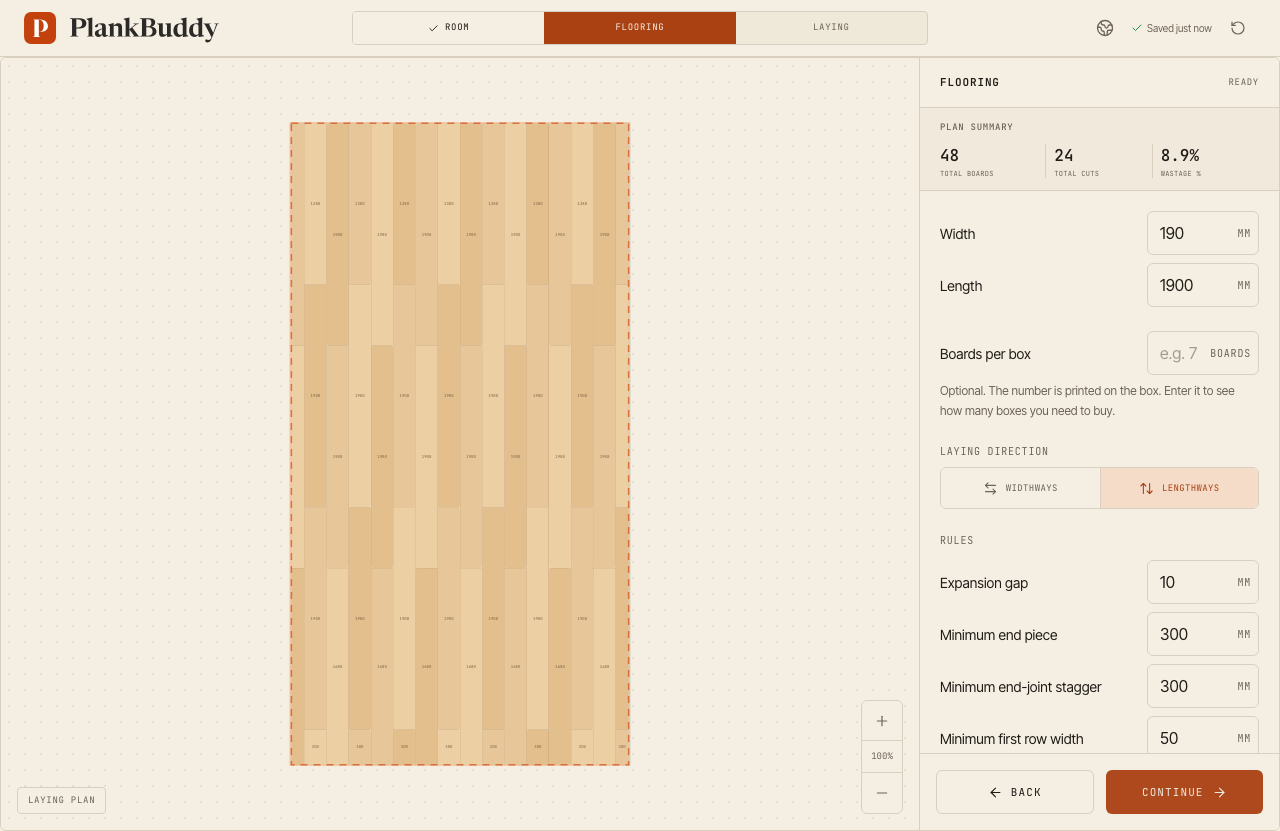
Example: A 5.5 × 2.9 m room with 1900 × 190 mm boards (an example size) laid lengthways, with a 10 mm expansion gap at each wall. The floor is 2880 mm wide between the gaps. Laid from a full first row, the last row would be only 30 mm, under the planner's default minimum row width of 50 mm. The plan cuts the first and last rows to 110 mm each instead. The plan has 16 rows and uses 48 boards with 24 cuts, and the wastage it measures is 8.9%.
- Direction. Usually towards the light from the main window, or along the room. See which way to lay hybrid flooring; the same reasoning applies to engineered timber.
- First and last rows. Work out the last row before you lay the first, so neither edge row ends up as a sliver. Read how to avoid a narrow last row.
- Stagger and end pieces. Long engineered boards often need a larger offset than laminate, so take the figure from your product's manual. Enter your product's minimum stagger and shortest end piece, and the plan checks every row.
Laying engineered timber step by step
The first row and the expansion gap
Start along a long, straight wall with spacers between the boards and the wall. Use the expansion gap your product's instructions give: timber floors and large rooms often need more than laminate, and many floors need an expansion joint in doorways. Check the first row with a string line: every row after it follows it.
Staggered end joints and offcuts
Start the next row with the offcut from the previous one if it is long enough and keeps the stagger. If it is too short for the next row, keep it: a later row may use it. The cutting plan shows which offcut goes where.
The last row
Measure the gap to the wall at both ends of the row, take off the expansion gap and cut the board to width. Use a pull bar where there is no room for a tapping block.
Door frames and skirting
Undercut the door frames so the boards slide underneath. Fix the skirting or scotia to the wall, not to the floor, so the floating floor can move.
Random-length boards: what the plan can't do
Some engineered timber comes in boxes of mixed lengths. PlankBuddy plans with one board length, so it cannot give an exact plan for random-length boxes. You can still use it to check the row widths, the first and last rows and the expansion gap, which depend only on the board width.
PlankBuddy lays straight rows only. Herringbone and other block patterns need a different kind of plan.
Questions about laying engineered timber flooring
Can engineered timber flooring be laid as a floating floor?
Many click engineered timber boards can, over the underlay the manufacturer names. Others must be glued or nailed down. Your product's installation instructions say which methods are allowed, and they come first.
How far should end joints be staggered in engineered timber?
Long engineered boards often need a larger offset than laminate, so take the figure from your product's manual. Enter the stagger and shortest end piece from your instructions in PlankBuddy, and the plan checks every row.
Can I plan random-length engineered timber boards?
Not exactly. PlankBuddy plans with one board length, so it cannot place mixed lengths. It still works out the row widths, the first and last rows and the expansion gap, which depend on the board width only.
See the laying rules that shape every row, or how to lay hybrid flooring step by step.