
Installing vinyl plank flooring at a glance
- Measure the room and work out how many boxes you need.
- Acclimate the boxes in the room if your instructions ask for it.
- Check that the subfloor is dry, flat and clean.
- Put down a vapor barrier and underlayment, as the instructions say.
- Choose the direction and plan the first and last rows.
- Install the first row with an expansion gap at the wall.
- Stagger the end joints from row to row.
- Rip and install the last row.
- Fit the planks around door jambs, pipes and transitions.
- Pull the spacers and install the baseboard or quarter round.
These steps cover a floating install of click-lock vinyl plank (LVP and rigid-core SPC), the most common DIY choice. Click-lock laminate and engineered hardwood go in much the same way, but their requirements differ. The installation instructions for your planks always come before general advice.
1. Read the installation instructions before you buy underlayment
Two planks with a similar locking system can need a different subfloor, underlayment, expansion gap and minimum piece length. The instructions also give the flatness tolerance, the largest floor without a transition and whether the planks can go over radiant heat. Write those values down before you buy anything.
2. Measure the room and count the boxes
Measure the length and width in several places, because walls are rarely straight. Note closets, kitchen cabinets, a fireplace hearth and anywhere else the floor stops. In an L-shaped room, measure each part so that together they describe one continuous floor.
Square footage is a starting point, but the number of boxes also depends on the cuts and on which offcuts go into later rows. The guide how many boxes of flooring do I need shows how to count them with and without a waste factor.
3. Acclimate the planks
Lay the closed boxes flat in the room where they will be installed. Many vinyl plank makers ask for about 48 hours at normal room temperature; some rigid-core products need less. Planks installed straight from a cold garage or a hot truck can move later, opening the joints or lifting the floor.
4. Prepare the subfloor: vapor barrier and underlayment
The subfloor must be dry, flat, clean and solid. Pull up carpet and tack strip, screw down loose or squeaky plywood and fill low spots. Check flatness with a long straightedge: the instructions give the tolerance, often only a fraction of an inch over several feet.
Vapor barrier and underlayment
Over a concrete slab, many products call for a vapor barrier, often 6-mil polyethylene with overlapped, taped seams. Many vinyl planks come with an attached pad; if yours do, do not add a second underlayment unless the instructions allow it. Over a plywood subfloor, the instructions say whether you need underlayment at all.
5. Choose the direction
The direction changes the number of rows, the plank lengths, the cuts and how the floor follows the room. Most people run the planks toward the main window or along the longest wall. Compare both directions before you cut. The guide which direction to lay vinyl plank flooring shows the difference in one room.
6. Plan the first and last rows together
If the room width, minus the expansion gap, is not a whole number of plank widths, the first or last row has to be ripped to width. Plan both rows together so you know their widths up front and avoid a narrow strip at the last wall.
Example: a room is 12' 0" (144") wide. With a 1/4" gap at each wall (use the value from your instructions), 143 1/2" is left. Planks with a 7.1" face width give 20 full rows and a last row only 1 1/2" wide. Instead, rip the first and last rows to about 4 1/4" each, with 19 full rows between them. The guide last row too narrow goes through the math.
7. Install the first row with an expansion gap
Start along the longest straight wall. Put spacers between the planks and the wall to hold the expansion gap. Many vinyl plank makers ask for 1/4" to 3/8", and more in large rooms, but the value in your installation instructions applies. Check the first row with a string line, because every other row builds on it.
8. Stagger the end joints from row to row
End joints in neighboring rows must not line up or land too close together. Where you can, start the next row with the offcut from the row before, if it is long enough. Your instructions give the minimum stagger and the shortest piece allowed. Avoid a regular stair-step pattern too. The guide vinyl plank installation rules explains the details.
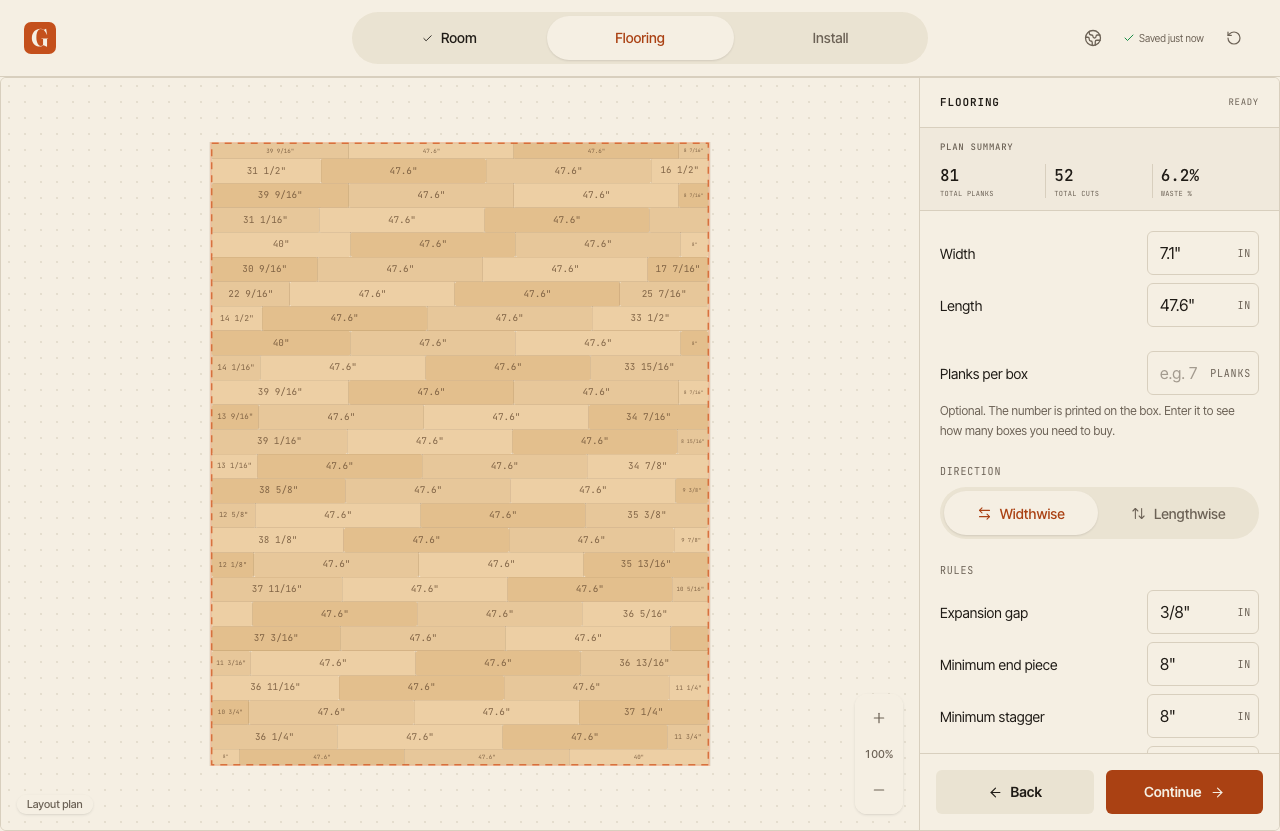
Example: a run is 143 1/2" after the gap. Full 47.6" planks fit 3 times with a 0.7" end piece left over, far too short to install. Start the row with a plank cut to 24" instead: 2 full planks follow, and the end piece is about 24 1/4". PlankBuddy checks this in every row and shows where to cut.
9. Install the last row
Measure the distance to the wall at both ends of the row, because the wall may not be straight. Subtract the expansion gap, mark the plank and rip it to width. Where there is no room for a tapping block at the wall, use a pull bar to close the last row.
10. Door jambs, pipes and transitions
Undercut door jambs and casing so the plank and underlayment slide underneath. Lay a loose plank on a piece of underlayment as a guide and cut the jamb with a jamb saw or an oscillating multi-tool. At pipes, drill a hole the size of the pipe plus twice the expansion gap, cut out the piece behind it and glue it back once the plank is in place. Doorways and large floors often need a transition strip or T-molding.
11. Install the trim and check the floor
Pull the spacers. Fasten the baseboard or quarter round to the wall, never through the planks, so the floating floor can still move. Add pipe collars and check that no joint has opened.
Tools for installing vinyl plank flooring
- Tape measure, speed square and pencil
- Utility knife (to score and snap vinyl plank) or a miter saw, and a jigsaw for notches
- Tapping block, pull bar and rubber mallet
- Spacers for the expansion gap
- A long straightedge to check flatness
- Tape for the vapor barrier seams
- Jamb saw or oscillating multi-tool, drill and hole saw for pipes
Common mistakes when installing vinyl plank
- Skipping acclimation. The floor moves later and joints open.
- Too small an expansion gap. The planks can buckle when they expand.
- An uneven subfloor. The locking joints are stressed, squeak or break.
- Working out the last row too late. A thin strip is left that is hard to install.
- Short pieces and end joints too close together. The floor is weaker and looks busy.
- Trim fastened through the planks. A floating floor can no longer move.
What PlankBuddy works out for you
PlankBuddy calculates a layout plan of straight rows for rectangular, L-shaped and more complex rooms. You see the width of the first and last rows, the length of every plank and where the end joints fall, in feet and inches. The plan also tracks every offcut: it goes into a later row if your rules allow, and it only counts as waste when the plan cannot use it anywhere. You get a row-by-row cut list and the number of boxes to buy.
Common questions about installing vinyl plank flooring
Can I install vinyl plank flooring myself?
Yes. Click-lock vinyl plank in an ordinary room is one of the floors DIYers handle best. The result depends on the preparation: a dry, flat subfloor, the right expansion gap and the first and last rows planned up front. If you are unsure about moisture, radiant heat or a bathroom, ask a flooring contractor.
Which wall should I start installing vinyl plank from?
Usually the longest straight wall. Work out the width of the last row first. If it comes out too narrow, rip the first row so both rows at the walls end up a similar width.
Do I need a vapor barrier under vinyl plank?
Over a concrete slab, many products call for one, often 6-mil polyethylene with taped seams. Over a dry plywood subfloor it is rarely needed, and some planks have an attached pad with a built-in barrier. Check the installation instructions for your planks and underlayment.
How big an expansion gap does vinyl plank need?
Many vinyl plank makers ask for 1/4" to 3/8", and more in large rooms. The value depends on the product and the size of the floor. Enter the gap from your installation instructions in the planner: it is taken off the floor before the rows are planned.
How long should vinyl plank acclimate?
Many manufacturers ask for about 48 hours with the boxes lying flat in the room where they will be installed; some rigid-core products need less. Your installation instructions give the exact time.