
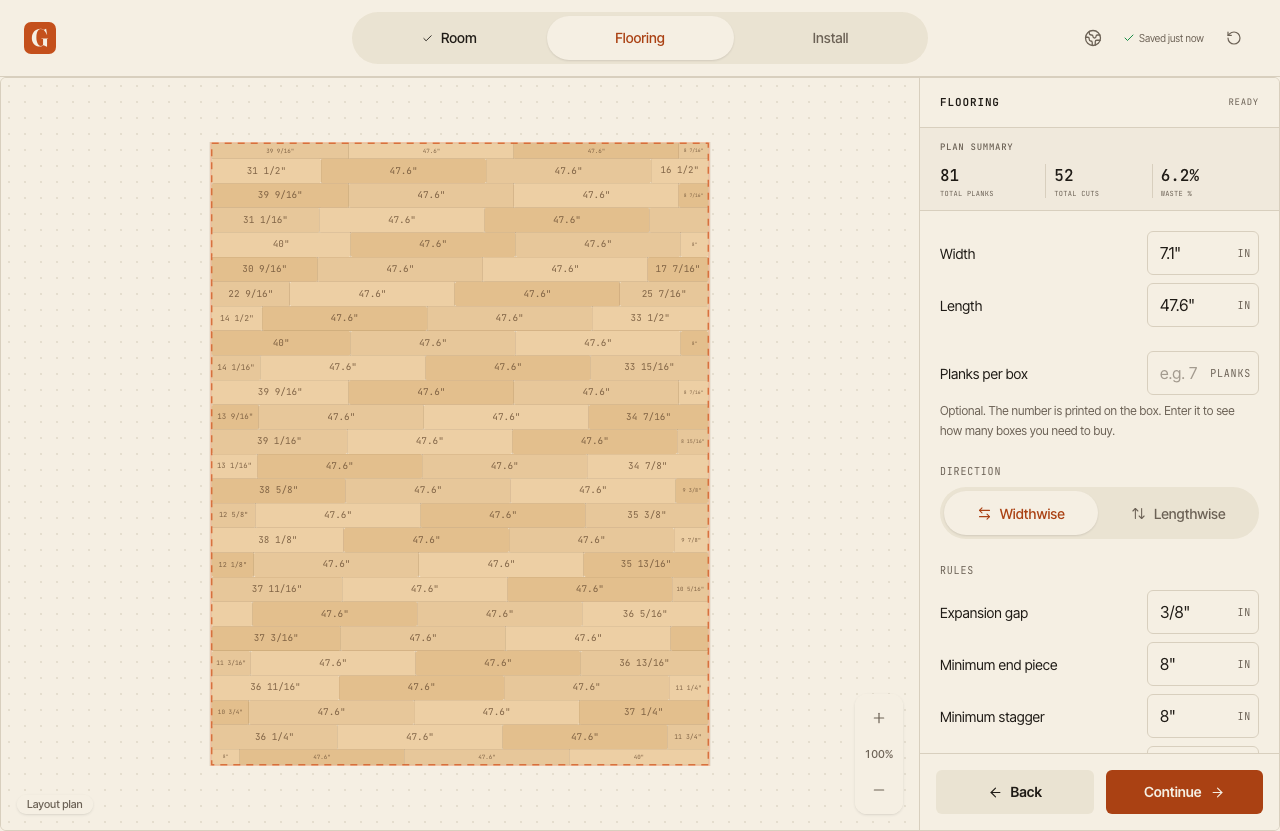
The values come from your installation instructions
No single value applies to every plank. Many vinyl plank makers ask for a 1/4" to 3/8" expansion gap and end joints staggered at least 6" to 8" apart (LifeProof, Shaw and COREtec, for example), and long engineered planks often need more. Enter the values from the installation instructions for your planks, because those are the ones that apply.
How far to stagger the end joints
End joints in neighboring rows must be staggered. If the first piece of a row puts an end joint too close to one in the row before, that row has to change. PlankBuddy checks that distance in every row and shows when the minimum stagger cannot be kept.
The goal is joints that never line up across several rows. Avoid a regular stair-step pattern too: it looks artificial and draws the eye.
How to stagger vinyl plank, row by row
- Row 1: start with a full plank at the starting wall and cut the last plank to fit, leaving the expansion gap.
- Row 2: start with the offcut from the end of row 1, if it is at least your shortest end piece and keeps the minimum stagger. Otherwise cut a plank to start it.
- Every row after that: do the same, and check the new end joints against the two rows before, not just the last one.
- Set short offcuts aside. A piece too short for the next row may still start or finish a later one.
Stagger patterns to avoid
- H pattern: end joints that line up every other row. It shows as a stripe across the floor and weakens it.
- Stair-step: every joint moves along by the same distance, so the joints march across the floor in a straight line.
- Joints closer than the minimum: the locking joints carry more strain there, which is why the instructions set a minimum.
A random stagger, with offsets that change from row to row but never drop below your minimum, looks the most natural, and starting rows with offcuts gives it to you almost automatically.
Start the next row with an offcut
The easiest way to get a good stagger is to start a new row with the offcut from the end of the row before. The end joints spread out on their own and no material is wasted. The offcut must be longer than the shortest piece allowed and give the required stagger. Set a short offcut aside for later, or for the end of another row.
Example: a run is 143 1/2" after the gap. Full 47.6" planks fit 3 times, leaving a 0.7" end piece, too short for any plank. Start the row with a plank cut to 24": 2 full planks follow, and the end piece is about 24 1/4". The 23 1/2" offcut (less the saw kerf) can start one of the next rows.
The shortest end piece
A very short piece at the wall is hard to lock in, and the instructions may not allow it. Enter the minimum from your instructions and the plan shows the rows that need a different first piece.
The expansion gap and the last row
A floating floor must be able to move. Leave the expansion gap at the walls and around fixed objects: door jambs, pipes, stairs and kitchen islands. The baseboard, quarter round or shoe molding covers it. The planner takes the gap you enter off the floor before it splits the floor into rows, so the gap also changes the width of the last row. The guide last row too narrow shows how to avoid a thin strip.
How PlankBuddy applies your rules
In the Flooring step you enter the expansion gap, the shortest end piece, the minimum stagger and the minimum width of the first and last rows, in inches. The plan keeps to those values in every row. When a rule cannot be met, the warning names the row and the rule, so you know what to check or change.
The rules do not replace the installation instructions
PlankBuddy lets you enter your own values, because no default fits every plank. Always follow the manufacturer's current installation instructions, and ask a flooring contractor if you are unsure about the subfloor, moisture, radiant heat or the structure of the room.
Common questions about staggering vinyl plank
How far apart should the end joints be on vinyl plank?
Your installation instructions give the minimum stagger. Many vinyl plank makers ask for at least 6" to 8". Enter the value in the planner and it checks every row against it.
Which stagger pattern looks most natural on vinyl plank?
A random one: end joints that move a different distance from row to row, never closer than your minimum. Avoid joints that line up every other row (an H pattern) and a regular stair-step. Starting each row with the offcut from the row before gives you a random stagger almost automatically.
Can I use the offcut to start the next row?
Yes, if it is long enough, its locking edge is intact and the stagger is kept. If it does not fit the next row, it may fit a later one. The plan shows where each offcut goes.
What covers the expansion gap?
The baseboard, quarter round or shoe molding at the walls, and transition strips at doorways. Fasten them to the wall or the baseboard, never through the planks, so the floating floor can still move.
What happens when a rule cannot be met?
The planner names the row and the rule, so you know what to change: the first row width, the direction, the plank size or the rule itself, within your installation instructions.
You will find these rules in action in how to install vinyl plank flooring and in a full vinyl plank layout with a cut list.