
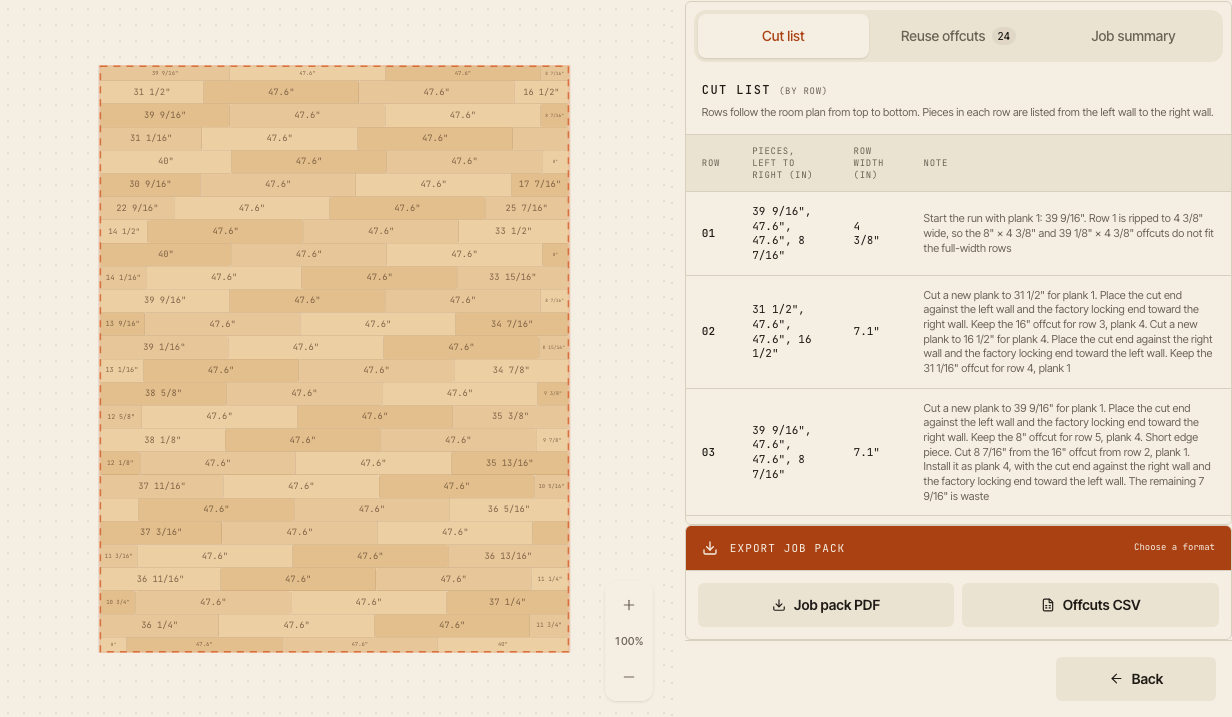
What a vinyl plank layout decides
- The direction the planks run, which sets the number and length of the rows.
- The width of the first and last rows, so neither is a thin strip at the wall.
- The starting piece of every row, so the end joints keep your minimum stagger.
- Which offcuts go into later rows, and which are left over as waste.
- The number of boxes, counted from the planks the layout uses.
Working those out by hand for one row is easy. Doing it for every row, while each row's offcut changes the next one's starting piece, is where a layout tool saves time and planks.
Example: a 15' × 12' room, laid out both ways
The room is 15' × 12' (180 sq ft). The planks are LifeProof Essential Oak, 7.1" × 47.6", 8 to a box (18.7 sq ft). The planner's default rules apply: a 3/8" expansion gap, an 8" shortest end piece and stagger, and first and last rows at least 2" wide.
| Direction | Rows | First and last row | Planks | Cuts | Waste | Boxes |
|---|---|---|---|---|---|---|
| Lengthwise | 21 | 4 1/8" each | 81 | 41 | 6.2% | 11 (7 spare) |
| Widthwise | 26 | 4 3/8" each | 81 | 52 | 6.2% | 11 (7 spare) |
Both layouts rip the first and last rows, so neither ends in a thin strip. Here they use the same 81 planks, but running the planks widthwise makes 5 more rows and 11 more cuts, so lengthwise is the quicker install. By square footage alone, 180 ÷ 18.7 rounds up to 10 boxes, 1 short of the layout; with a 10% waste factor it is 11.
How to lay out vinyl plank flooring by hand
- Measure the room width at both ends and in the middle, and use the smallest measurement.
- Subtract the expansion gap at both walls, from your installation instructions.
- Divide by the face width of the plank, without the tongue. What is left over is the last row.
- Balance the edge rows. If the last row would be under your minimum, add it to one plank width and split it between the first and last rows. The guide last row too narrow shows the math.
- Snap a chalk line for the first row: the first row width plus the gap, measured from the wall at both ends.
- Plan the starting piece of each row so the end joints keep your minimum stagger, using the offcut from the row before where it fits. See how to stagger vinyl plank flooring.
The planner does all six steps at once, for rectangular, L-shaped and more complex rooms, and checks every row against the rules you enter.
Reading the cut list
Every row in the layout has a number. Under each row, the cut list gives the planks in the order you install them: "Full" for a full plank, or the length to cut, rounded down to the nearest 1/16" so a piece always fits its space. Notes flag the starting piece and the offcuts to reuse, for example "Use the whole offcut from row 4, plank 4, as plank 1". Keep each offcut until the cut list says where it goes.
Take the layout to the job
When the plan is ready, the cut list is in the Install step. Choose Job pack PDF to download the layout plan, the cut list and the offcut instructions in one file, on US Letter paper.
What the layout tool does not do
PlankBuddy plans straight rows of one plank length. It does not lay out patterned or random-length floors. The layout is calculated from the measurements you enter: measure on site before every cut, and follow the manufacturer's installation instructions for your planks.
Common questions about vinyl plank layout
Is there a free vinyl plank layout tool?
Yes. The planner is free and needs no account. Enter the room in feet and inches and the plank size from the box, and it lays out every row, the cut list and the boxes to buy. It plans straight rows of one plank length.
How do I lay out vinyl plank flooring before installing?
Decide the direction, work out the first and last row widths so neither is a thin strip, and plan the starting piece of every row so the end joints keep your minimum stagger. A layout plan does all three at once and shows them row by row.
Should I snap a chalk line for the first row?
Yes, if the starting wall is not straight. Measure out from the wall at both ends by the first row width plus the expansion gap, snap a line and install the first row to the line, not the wall. Scribe the first row to the wall where the gap varies.
Next: how to install vinyl plank flooring step by step, how many boxes you need, or a layout for an L-shaped room.